kasei_sanのブログ

かせいさんのIT系のおぼえがきです。胡乱の方はnoteとtwitterへ

GitHub Actions から AWS lambda を実行してみる

こちらのつづき

blog.kasei-san.com

GitHub Actions から AWS lambda を実行するまでの流れ

  • lambdaを作成
  • lambdaの実行権限を持つIAMユーザを作成
  • AWS認証の action aws-actions/configure-aws-credentials を GitHub Actions に組み込む
  • 認証に使用する、lambdaの実行権限を持つIAMユーザの各キーを secrets に設定
  • 実行

lambdaを作成

"hello" を puts するだけのシンプルな lambda hellous-east-1 に作成

require 'json'

def lambda_handler(event:, context:)
    # TODO implement
    
    puts 'hello'
    
    { statusCode: 200, body: JSON.generate('Hello from Lambda!') }
end

lambdaの実行権限を持つIAMユーザを作成

IAMユーザ github-actions を作成

$ aws iam create-user --user-name github-actions
{
    "User": {
        "Path": "/",
        "UserName": "github-actions",
        "UserId": "********",
        "Arn": "arn:aws:iam::********:user/github-actions",
        "CreateDate": "2020-03-03T05:02:59Z"
    }
}

github-actions に lambda実行権限持つロールを付与

$ aws iam attach-user-policy \
  --user-name github-actions \
  --policy-arn arn:aws:iam::aws:policy/service-role/AWSLambdaRole

ローカルで動作確認

$ aws lambda invoke --function-name hello --region us-east-1 response.json
{
    "StatusCode": 200,
    "ExecutedVersion": "$LATEST"
}

AWS認証の action aws-actions/configure-aws-credentials を GitHub Actions に組み込む

aws-actions/configure-aws-credentials は AWS 公式の github action

Configure AWS credential and region environment variables for use in other GitHub Actions.

github.com

こんなふうに、アクセスキーとシークレットキーとリージョンを設定してやれば、ユーザの権限に応じた、AWS CLI が使えるようになる

name: CI
on: [push]
jobs:
  build:
    runs-on: ubuntu-latest
    steps:
    - uses: actions/checkout@v2
    - name: Configure AWS Credentials
      uses: aws-actions/configure-aws-credentials@v1
      with:
        aws-access-key-id: ${{ secrets.AWS_ACCESS_KEY_ID }}
        aws-secret-access-key: ${{ secrets.AWS_SECRET_ACCESS_KEY }}
        aws-region: us-east-1
    - name: Run a one-line script
      run: echo Hello, world!
    - name: Run a multi-line script
      run: |
        echo Add other actions to build,
        echo test, and deploy your project.

認証に使用する、各キーを secrets に設定

GitHub Actionsで使用したい秘匿情報は、secrets に設定して、そこから取得する

アクセスキーを取得

$aws iam create-access-key --user-name github-actions


{
    "AccessKey": {
        "UserName": "github-actions",
        "AccessKeyId": "********",
        "Status": "Active",
        "SecretAccessKey": "********",
        "CreateDate": "2020-03-03T05:03:23Z"
    }
}

アクセスキーを github の secrets に設定

secrets に設定することで、GitHub Actions にて ${{ secrets.key_name }} で参照できるようになる

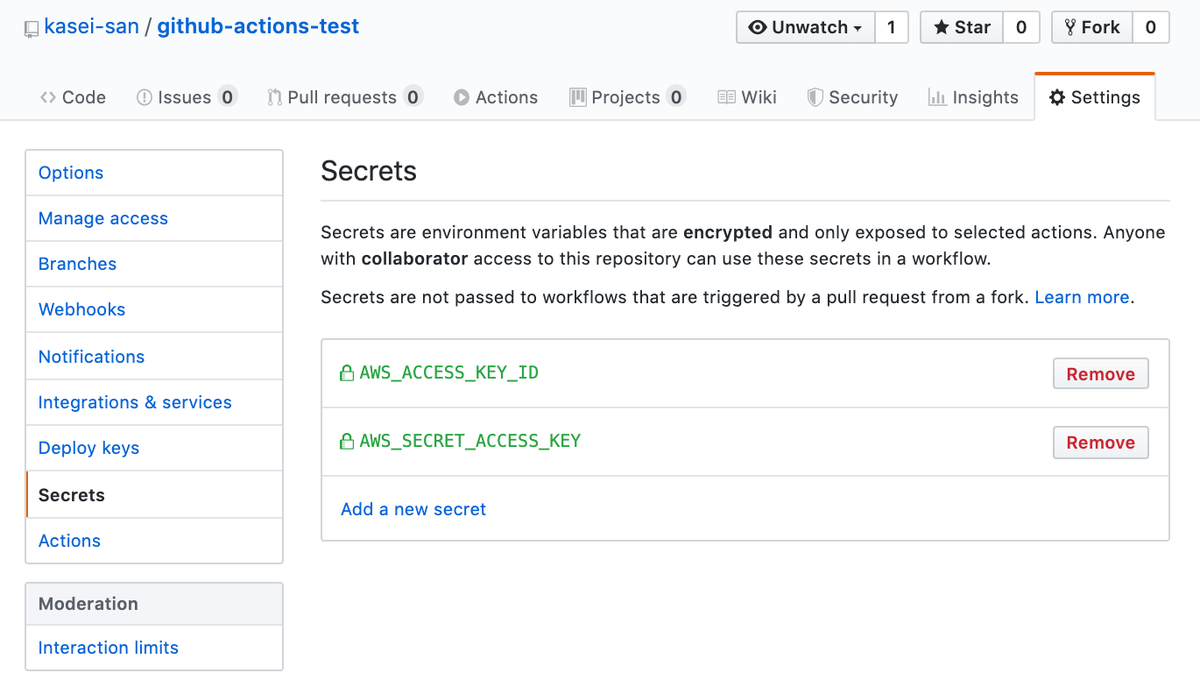
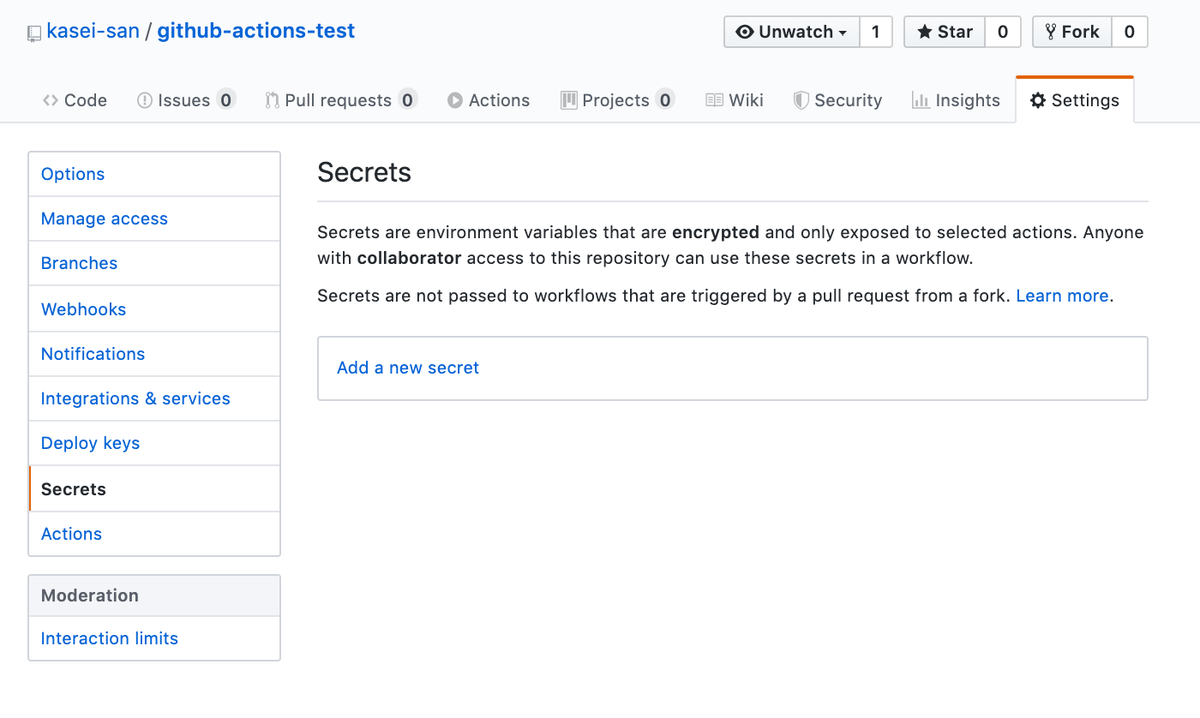
settings -> secrets で設定可能
f:id:kasei_san:20200304175044p:plain

ここに、AWS_ACCESS_KEY_IDAWS_SECRET_ACCESS_KEY を設定する

f:id:kasei_san:20200304175206p:plain

実行

lambdaを実行する処理をstepに追加する

name: CI
on: [push]
jobs:
  build:
    runs-on: ubuntu-latest
    steps:
    - uses: actions/checkout@v2
    - name: Configure AWS Credentials
      uses: aws-actions/configure-aws-credentials@v1
      with:
        aws-access-key-id: ${{ secrets.AWS_ACCESS_KEY_ID }}
        aws-secret-access-key: ${{ secrets.AWS_SECRET_ACCESS_KEY }}
        aws-region: us-east-1
    - name: Run a hello lambda
      run: aws lambda invoke --function-name hello response.json

動作確認

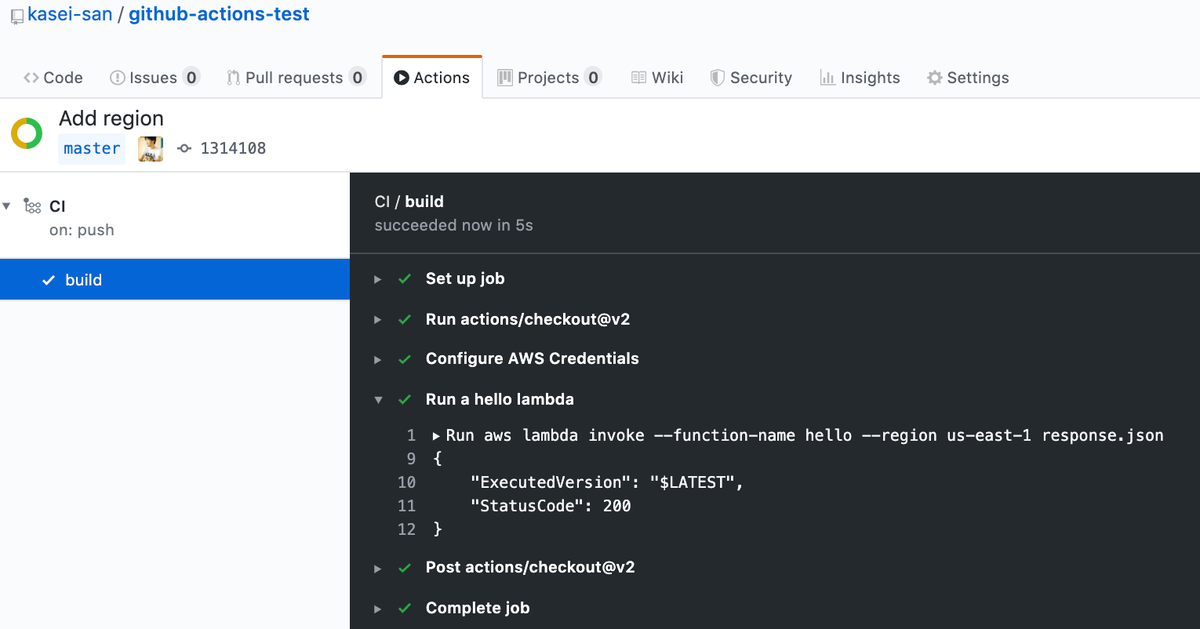
コードをPUSHして、GitHub Actions から lambda が実行されて、正常終了の結果が返ってきたことを確認 👏
f:id:kasei_san:20200304175342p:plain

GitHub Actions はじめの一歩

GitHub Actions とは

GitHub の特定のアクションをトリガーにCI/CD的なことを実行できるサービス

  • CircleCI とか AWS Codebuild みたいのを GitHub が提供してくれるようになった

help.github.com

アクションのつくりかた

Githubのリポジトリから「Actions」を選択

いろんなActionをサジェストしてくれるけど、今回は Simple workflow を選択

f:id:kasei_san:20200304163103p:plain

すると、 .github/workflows/blank.yml にファイルが生成される

f:id:kasei_san:20200304163516p:plain

name: CI
on: [push]
jobs:
  build:
    runs-on: ubuntu-latest
    steps:
    - uses: actions/checkout@v2
    - name: Run a one-line script
      run: echo Hello, world!
    - name: Run a multi-line script
      run: |
        echo Add other actions to build,
        echo test, and deploy your project.

設定ファイルの構文

公式ドキュメントを参照

help.github.com

ざっくりこんなかんじ

  • name : 名前
  • on : 発火するイベント
  • jobs : イベント発火時に実行する処理を格納するところ
  • jobs.<job_id> : イベント発火時に実行する処理。<job_id> は build
  • jobs.<job_id>.runs-on : 実行環境。windowsとかMacOSもある
  • jobs.<job_id>.steps : 実行する処理
  • jobs.<job_id>.uses : ジョブのステップの一部として実行される外部のアクション。公開リポジトリなどを参照できる。今回の場合 https://github.com/actions/checkout が実行される
  • jobs.<job_id>.name githubに表示されるステップの名前
  • jobs.<job_id>.run ステップで実行される処理。runs-on で指定したOSでコマンドラインが実行される

アクションを実行してみる

コードを commit すると早速アクションが実行される

実行結果

f:id:kasei_san:20200304164746p:plain

step単位で処理が実行されているのが分かる

感想

  • 他サービスを使わずにGitHub上でCIまでまとめて実行できるのは良い感じに思える
  • 今の会社だと、CIにAWS CodeBuildを使っているが、private VPCでビルドする必然性がなければ、GitHub Actionsに移行した方が管理がシンプルになってよいのかもしれない
  • PRとの連携も、他のサービス使うより楽そう(な気がする

ざっくりそんなかんじ

httpのレスポンスの動作確認をしたい時に知ってると便利ないろいろ

httpstat.us

httpstat.us

http://httpstat.us/${コード} で任意のレスポンスコードを返してくれるサービス

こんなかんじ

$ curl -I https://httpstat.us/200
HTTP/1.1 200 OK
$ curl -I https://httpstat.us/404
HTTP/1.1 404 Not Found

どうやら個人で作っているサイトなので CI とかに組み込むのはやめておいたほうが良いかも

http://ozuma.sakura.ne.jp/httpstatus/

ozuma.sakura.ne.jp

こちらも個人制作の任意のレスポンスコードを返してくれるサービス

$ curl -I https://ozuma.sakura.ne.jp/httpstatus/404
HTTP/2 404 

.invalid

RFC2606 で定義されている、無効なドメイン

digすると、NXDOMAIN が返ってくる

 $ dig example.invalid

; <<>> DiG 9.10.6 <<>> example.invalid
;; global options: +cmd
;; Got answer:
;; ->>HEADER<<- opcode: QUERY, status: NXDOMAIN, id: 9629
;; flags: qr rd ra; QUERY: 1, ANSWER: 0, AUTHORITY: 1, ADDITIONAL: 1

確実に存在しないので、そういう動作確認をしたい時に便利

AWS SDK for Ruby で Application Load Balancer にいろいろな Listener を追加する方法おぼえがき

Listenerとは

リスナーとは、設定したプロトコルとポートを使用して接続リクエストをチェックするプロセスです。リスナーに対して定義したルールにより、ロードバランサーが登録済みターゲットにリクエストをルーティングする方法が決まります。

Application Load Balancer のリスナー - Elastic Load Balancing

80番ポートのリクエストを443番ポートにリダイレクトする

client = Aws::ElasticLoadBalancingV2::Client.new
client.create_listener(
  default_actions: [
    {
      type: 'redirect',
      order: 1,
      redirect_config: {
        protocol: 'HTTPS',
        port: '443',
        host: '#{host}',
        path: '/#{path}',
        query: '#{query}',
        status_code: 'HTTP_301'
      }
    },
  ],
  load_balancer_arn: LOAD_BALANCER_ARN,
  port: 80,
  protocol: 'HTTP'
)

443番ポートのリクエストを特定のターゲットグループに渡す

client.create_listener(
  certificates: [
    certificate_arn: CERTIFICATE_ARN,
  ],
  default_actions: [
    {
      target_group_arn: TARGET_GROUP_ARN,
      type: 'forward'
    },
  ],
  load_balancer_arn: LOAD_BALANCER_ARN,
  port: 443,
  protocol: 'HTTPS',
  ssl_policy: 'ELBSecurityPolicy-2015-05'
)

443番ポートのリクエストの場合503を返す

client.create_listener(
  certificates: [
    certificate_arn: CERTIFICATE_ARN,
  ],
  default_actions: [
    {
      type: 'fixed-response',
      fixed_response_config: {
        status_code: '503'
      }
    },
  ],
  load_balancer_arn: LOAD_BALANCER_ARN,
  port: 443,
  protocol: 'HTTPS',
  ssl_policy: 'ELBSecurityPolicy-2015-05'
)
  • status_code の値は数字ではなく文字列

参考

公式ドキュメント

serverless で AWS lambda のログ出力の有効期限を制御する方法

サンプル

function hoge_fuga-aaa の出力先ロググループの有効期限を30日にする場合

serverless.yml

functions:
  hoge_fuga-aaa:
    handler: handler.api_create
    events:
      - http:
          path: api/create
          method: post
resources:
  Resources:
    HogeUnderscoreFugaDashAaaLogGroup:
      Properties:
        RetentionInDays: "30"
  • resources は serverless が使用する CloudFormationリソースを上書きする設定
  • 特定の function のロググループは、#{function名をアッパーケースにした文字列}LogGroup で定義される
    • このとき -Dash に、_Underscore に変換されるので注意
  • PropertiesRetentionInDays を設定すれば、有効期限が設定される
    • デフォルトでは有効期限なし

参考

公式の解説

https://github.com/serverless/serverless/blob/master/docs/providers/aws/guide/resources.md#override-aws-cloudformation-resource

lambdaプロキシ統合を使って、API Gatewayからlambdaへ各種パラメータを渡す方法

lambdaプロキシ統合って?

API Gatewayが受け取ったパラメータやリクエストヘッダなどの情報をlambdaのevent引数にわたすようにする方法

Lambda プロキシ統合では、クライアントが API リクエストを送信すると、API Gateway は、統合された Lambda 関数に raw リクエストをそのまま渡します。ただし、リクエストパラメータの順序は保持されません。このリクエストデータには、リクエストヘッダー、クエリ文字列パラメータ、URL パス変数、ペイロード、および API 設定データが含まれます。設定データには、現在のデプロイステージ名、ステージ変数、ユーザー ID、または承認コンテキスト (存在する場合) を含めることができます。

API Gateway の Lambda プロキシ統合をセットアップする - Amazon API Gateway

どうやって設定するの?

API Gateway作成時に「lambdaプロキシ統合」をonにする

f:id:kasei_san:20200214103917p:plain

lambdaプロキシ統合した時のevent引数の中身

API Gatewayで、 /create?branch_name=aaa&commit_hash=bbb というPATHを叩いた場合のevent引数の中身

{
  "resource": "/create",
  "path": "/create",
  "httpMethod": "GET",
  "headers": null,
  "multiValueHeaders": null,
  "queryStringParameters": {
    "branch_name": "aaa",
    "commit_hash": "bbb"
  },
  "multiValueQueryStringParameters": {
    "branch_name": [
      "aaa"
    ],
    "commit_hash": [
      "bbb"
    ]
  },
  "pathParameters": null,
  "stageVariables": null,
  "requestContext": {
    "resourceId": "*****",
    "resourcePath": "/create",
    "httpMethod": "GET",
    "extendedRequestId": "*****",
    "requestTime": "29/Jan/2020:08:28:51 +0000",
    "path": "/create",
    "accountId": "*****",
    "protocol": "HTTP/1.1",
    "stage": "test-invoke-stage",
    "domainPrefix": "testPrefix",
    "requestTimeEpoch": 1580286531393,
    "requestId": "*****",
    "identity": {
      "cognitoIdentityPoolId": null,
      "cognitoIdentityId": null,
      "apiKey": "test-invoke-api-key",
      "principalOrgId": null,
      "cognitoAuthenticationType": null,
      "userArn": "arn:aws:iam::*****:*****",
      "apiKeyId": "*****",
      "userAgent": "aws-internal/3 aws-sdk-java/1.11.690 Linux/4.9.184-0.1.ac.235.83.329.metal1.x86_64 OpenJDK_64-Bit_Server_VM/25.232-b09 java/1.8.0_232 vendor/Oracle_Corporation",
      "accountId": "*****",
      "caller": "*****",
      "sourceIp": "*****",
      "accessKey": "*****",
      "cognitoAuthenticationProvider": null,
      "user": "*****"
    },
    "domainName": "testPrefix.testDomainName",
    "apiId": "*****"
  },
  "body": null,
  "isBase64Encoded": false
}

クエリパラメータを取りたい場合

event['queryStringParameters']event['multiValueQueryStringParameters'] から取る

POSTされたデータを取りたい場合

event['body'] から取る。テキストデータで来るので、parseする必要があるので注意

AWS CodeBuild の buildspec.yml のコマンドで curl の完了前に処理が終了する件とその対策

buildspec.yml(一部)

post_buildcurl を実行後にその戻り値をチェックする command を実行する

実際のコードでは、API Gatewayを叩いていた

version: 0.2

phases:
  post_build:
    commands:
      - curl https://example.com
      - echo $?

実行結果

すると、 curl が完了する前に、次のコマンドが実行され、最終的に curl が完了する前に post_build が完了してしまう

[Container] 2020/02/04 01:51:29 Running command curl https://example.com

[Container] 2020/02/04 01:51:29 Running command echo $?
0

[Container] 2020/02/04 01:51:29 Phase complete: POST_BUILD State: SUCCEEDED
[Container] 2020/02/04 01:51:29 Phase context status code:  Message: 
  % Total    % Received % Xferd  Average Speed   Time    Time     Time  Current
                                 Dload  Upload   Total   Spent    Left  Speed

  0     0    0     0    0     0      0      0 --:--:-- --:--:-- --:--:--     0
  0     0    0     0    0     0      0      0 --:--:-- --:--:-- --:--:--     0curl: (6) Could not resolve host: example.com

原因

不明

対策

curlを使わないようにした

version: 0.2

phases:
  install:
    runtime-versions:
      ruby: 2.6

  post_build:
    commands:
      - ruby ./kick_api.rb
      - echo echo $?

kick_api.rb

require 'net/https'
require 'uri'

uri = URI.parse('https://example.com')
puts "Kick API: #{uri.to_s}"

res = Net::HTTP.get_response(uri)

puts "Responce code: #{res.code}"
puts "Responce body: #{res.body}"
res.value # 200以外なら例外を返す