kasei_sanのブログ

かせいさんのIT系のおぼえがきです。胡乱の方はnoteとtwitterへ

【1日1gem】 rspec3 でも its が使いたい! rspec/rspec-its

1日1gemとは

最近好きなgemってありますか? という質問に自分が答えられるように始めたgemを紹介する記事

rspec/rspec-its

https://github.com/rspec/rspec-its

何をするの?

rspec3 で core から無くなった、 its を復活させる gem

  • 正確には、 its が別gemに分離した

サンプル

require_relative '../lib/hoge'

RSpec.describe Hoge do
  let(:message){ 'hello' }
  subject { Hoge.new(message) }

  # こんな風に書き換えられる
  #it { expect(subject.message).to eq(message) }
  its(:message) { is_expected.to eq(message) }

  # ネストできる
  its('say.hello') { is_expected.to eq('hello') }

  describe '#saids' do
    before do
      @hoge = Hoge.new(message)
      @hoge.say.hello
      @hoge.say.hoo
    end
    subject { @hoge }
    # 複数型なら `are_expected`
    its('saids') { are_expected.to eq(%w[hello hoo]) }

    describe 'array' do
      subject { @hoge.saids }
      # 配列の要素指定
      its([1]) { is_expected.to eq('hoo') }
    end
  end
end

そもそもなんで its が core から無くなったの?

ここに、rspec の中の人のコメントがある

Explanation for why `its` will be removed from rspec-3 · GitHub

要約すると、 its を使った場合に、rspecの出力結果が直感的でなくなって、デバッグに支障がでると思うので辞めたとのこと ただ、個人的にはあんまり納得いってない

  • コメントにある it { expect(subject.name).to eq "Bob" } みたいに書いた場合、 its と変わんないのに、ただコードが長くなるだけでないの? という疑問への回答が無い
  • 悪い例が書かれているけど、良い例が無いので、「じゃあどうするのが理想なの?」への回答が無い
  • そもそも、rspec って、テストコードを英文と一致させることを諦めてなかったっけ?

ActiveRecordeの関連付けで、class名と異なる関連名を使いたい場合、 class_name オプションを使う

こんな場合

class Item < ActiveRecord::Base
  has_one :item_detail, dependent: :destroy
end
class ItemDetail < ActiveRecord::Base
  belongs_to :item
end

ItemDetail を参照するとき、記述が冗長になってしまう

# item って単語が重複するのがキモい
item.item_detail.description

こういう時には、class_name オプション

class Item < ActiveRecord::Base
  has_one :detail, dependent: :destroy, class_name: ItemDetail
end

こうすることで、関連名は、 detail。 実際に使用する model は、 ItemDetail になる

item.detail.description

便利!

paperclip の写真の格納先をS3に変更する

やりたいこと

paperclip の写真の格納先をS3にしたい

方法

Paperclip に S3 用のオプションがあるので、それを使う

aws-sdk のインストール

Gemfile

gem 'aws-sdk'

paperclip のデフォルトの設定を追加

config/application.rb

  class Application < Rails::Application
    config.active_record.raise_in_transactional_callbacks = true

    config.paperclip_defaults = {
      storage:        :s3,
      bucket:         ENV['S3_BUCKET'],
      s3_region:      ENV['AWS_REGION'],
      s3_credentials: {
        access_key_id:     ENV['AWS_ACCESS_KEY'],
        secret_access_key: ENV['AWS_SECRET_ACCESS_KEY']
      },
      hash_secret:    'uO4l0IJA5hWKPo3kDgXj/Oo9H1KvDt912jDkzOIpP2ecaBMQgejN0MtVdkCee0FMOooNAnqIyMzIbb9BINVMbVza8Xbu8LT7Ee1vu538JzRtUKpLlB6hOezs/FzCBSmmmch4pDUemROm7iS8O8GAKs9jNkLUJydbqXHBvWX2qJM',
      path:           ':attachment/:style/:hash.:extension',
    }
  end
end
  • storage: S3を使いたい場合は :s3
  • bucket: 格納先のbucket名
  • s3_credentials: S3の認証情報
    • access_key_id と、secret_access_key が必要
  • s3_region: S3のリージョン
    • S3の管理画面にアクセスした時に home?region=us-east-1 みたいに URLに表示されるやつを指定すればよい...はず...
  • s3_host_name: S3のホスト名
    • S3の管理画面の適当なオブジェクトのプロパティを開いて「リンク」を見れば分かる
  • hash_secret: ファイル名にhash(後述)を使いたい場合のhashのキー
    • secret とあるけど、まぁ別にhash名から元のファイル名を復元されても困らないので直書き
  • path: S3のup先のpath
    • attachment: has_attached_file で指定した attachment_name
    • style: has_attached_file で指定した style
      • medium とか thumb とか。後オリジナル画像は、original
    • hash: ファイル名をhashにしたもの
      • ファイル名が2バイト文字とかの時に困らないように
    • extension: ファイルの拡張子

参考 : https://github.com/thoughtbot/paperclip#defaults

トラブルシューティング

endpoint を指定しろ的なエラーが出る

The bucket you are attempting to access must be addressed using the specified endpoint. Please send all future requests to this endpoint
  • s3_host_name の設定漏れ

環境変数 AWS_REGION を設定しろ的なエラーが出て、設定してもおんなじエラーが出る

Aws::Errors::MissingRegionError (missing region; use :region option or export region name to ENV['AWS_REGION']):
  • s3_region を設定する
  • 環境変数を設定しても paperclip の s3_region を優先するらしく、反映されない

Paperclip を使って Rails アプリに画像アップロード機能を追加する

やりたいこと

Rails アプリに画像アップロード機能を追加したい

方法

thoughtbot/paperclip を使う

paperclip のインストール

Gemfile

# 次のイテレーションで aws-sdk を使うが、その時に ver2 を使いたいので、Paperclipを最新のものにした
gem 'paperclip', git: 'https://github.com/thoughtbot/paperclip', tag: 'v5.0.0.beta1'

Photo model に、paperclip の設定を追加

app/models/photo.rb

class Photo < ActiveRecord::Base
  belongs_to :item
  has_attached_file :image, styles: { medium: "300x300>", thumb: "100x100>" }, default_url: "/images/:style/no_image.png"
  validates_attachment_content_type :image, content_type: /\Aimage\/.*\Z/
end

Paperclip::ClassMethods#has_attached_file

has_attached_file( attachment_name, options={} )
  • attachment_name : 添付ファイルを参照する時に使用する名前。
    • 今回ならば、 photo.image_file_name のように、 attachment_name に紐付いた属性が追加される
  • options :
    • styles : オリジナルと別に、#{name}: #{size} で指定したサイズの画像を生成する
    • default_url : 画像がない場合に表示する画像のPATH

参考 : https://github.com/thoughtbot/paperclip#usage

migrate で、Photo に paperclip 用のカラムを追加

rails g migration AddImageColumnsToPhotos
class AddImageColumnsToPhotos < ActiveRecord::Migration
  def up
    add_attachment :photos, :image
  end

  def down
    remove_attachment :photos, :image
  end
end

View

app/views/items/show.html.haml

%ul
  - @item.photos.each do |photo|
    %li
      = photo.title
    %li
      = image_tag photo.image.url(:thumb)

Form

params[:photo] を許可

app/controllers/items_controller.rb

    def item_params
      params.require(:item).permit(:name, :price, photos_attributes: %i[id title image _destroy])
    end

form に file_field を追加

app/views/items/_photo_fields.haml

.nested-fields
  .field
    = f.label :title
    %br
    = f.text_field :title
    = f.file_field :image
  = link_to_remove_association 'remove', f

これで、public/system に写真がupされるようになる

.
└── photos
    └── images
        └── 000
            └── 000
                └── 001
                    ├── medium
                    │   └── IMG_8990.JPG
                    ├── original
                    │   └── IMG_8990.JPG
                    └── thumb
                        └── IMG_8990.JPG

cocoon を使って、1フォームで1対多のモデルを動的に編集できるようにする

やりたいこと

Railsで1対多のmodelがあるときに、 親modelのformで子modelを動的に追加したり削除したりしたい

方法

nathanvda/cocoon を使う

つくりかた

Gemfile

gem 'cocoon'

Item の scaffold を generate

rails g scaffold item name:string price:integer

Photo model を generate

rails g model photo title:string item_id:integer

Item と、Photo をリレーション

app/models/Photo.rb

class Photo < ActiveRecord::Base
  belongs_to :item
end

app/models/item.rb

class Item < ActiveRecord::Base
  has_many :photos, dependent: :destroy
end

db/seeds.rb

1.upto(10) do |i|
  item = Item.create(name: "item_#{i}", price: i*100)
  1.upto(5) do |j|
    item.photos << Photo.create(title: "#{i}_#{j}")
  end
end

ここで急に haml で書きたくなった

Gemfile

gem 'haml-rails'
gem 'erb2haml'
bundle install

一括変換!

rake haml:replace_erbs

ItemController#show で、 Photo を表示するように

app/controllers/items_controller.rb

    def set_item
      @item = Item.includes(:photos).find(params[:id])
    end

app/views/items/show.html.haml

%p
  %strong Name:
  = @item.name
%p
  %strong Price:
  = @item.price
%ul
  - @item.photos.each do |photo|
    %li
      = photo.title

Item の form で Photo を更新可能に

動的な追加/削除のための js ライブラリを追加

app/assets/javascripts/application.js

//= require cocoon

cocoonが使うパラメータを許可(_destroy は削除用)

app/controllers/items_controller.rb

     def item_params
       params.require(:item).permit(:name, :price, photos_attributes: %i[id title _destroy])
     end

子要素の追加/編集/削除を許可

app/models/item.rb

accepts_nested_attributes_for :photos, reject_if: :all_blank, allow_destroy: true

子要素を編集するフォームを追加

app/views/items/_form.html.haml

 %h3 Photos
 #photos
   = f.fields_for :photos do |photo|
     = render 'photo_fields', f: photo
   .links
     = link_to_add_association 'add photo', f, :photos```

app/views/items/_photo_fields.haml

.nested-fields
  .field
    = f.label :title
    %br
    = f.text_field :title
  = link_to_remove_association 'remove', f

できた!

http://localhost:3000/items

f:id:kasei_san:20160324222259p:plain

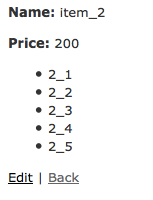
http://localhost:3000/items/2

f:id:kasei_san:20160324222330p:plain

http://localhost:3000/items/2/edit

f:id:kasei_san:20160324222358p:plain

github

https://github.com/kasei-san/relation_form_sample

参考

過去のcommitを修正したい時は、 `git commit --fixup` と `git rebase --autofixup` を使おう!

先に結論

  • 過去のcommitを修正したい時は、 git commit --fixup=#{commit番号} してから、git rebase --autofixup
  • --autofixup オプションは、 git commit --fixup した commit を自動的に fixup してくれる
  • git rebasefixup は、対象の commit を上の commit と結合させる命令

例えばこんな状態

* 8a66664 (HEAD -> refs/heads/branch) Add 02.txt
* c85bd12 Add aaa on 01.txt
* 7b24435 Add 01.txt
* a8bc429 (refs/heads/master) first commit
  • branch ブランチで、01.txt を作って、中身に 'aaa' を入れて、その後 02.txt を作った

ここで、01.txt に入れる内容は 'bbb' であったことに気づく!

さあどうする

ここで、 git commit --fixup の登場!

  • 引数に、修正対象のcommit番号を入れる
g ci --fixup=c85bd12
[branch 63cb5d4] fixup! Add aaa on 01.txt
 1 file changed, 1 insertion(+), 1 deletion(-)

すると、自動的にコミットメッセージが生成されて commit される

* 63cb5d4 (HEAD -> refs/heads/branch) fixup! Add aaa on 01.txt
* 8a66664 Add 02.txt
* c85bd12 Add aaa on 01.txt
* 7b24435 Add 01.txt
* a8bc429 (refs/heads/master) first commit

git rebase --autofixup

git rebase --autofixup すると、--fixup した commit をこんな風にいい感じにしてくれる

git rebase master -i --autofixup
pick 7b24435 Add 01.txt                
pick c85bd12 Add aaa on 01.txt         
fixup 63cb5d4 fixup! Add aaa on 01.txt 
pick 8a66664 Add 02.txt                

最終的なcommitログ

* 0423c38 (HEAD -> refs/heads/branch) Add 02.txt
* 362238a Add aaa on 01.txt
* 7b24435 Add 01.txt
* a8bc429 (refs/heads/master) first commit

c85bd1263cb5d4 が統合された!!

便利

2-3個 commit を重ねた後に、間違い気付いた場合にさっと修正できるのが気持ち良い!

追記

今回のような修正の場合は git commit --squash と、 git rebase --autosquash の方がよいかも

  • squash なので、圧縮後にコミットメッセージを修正できる

追記2

autofixup と、autosquash オプションを on にしておくと楽。

  • rebase 時に勝手に、 --autosquash --autofixup をつけてくれる

.gitconfig

[rebase]
    autofixup = true
    autosquash = true

参考

追記

first commit を rebase したい場合

git rebase -i --root 

git rebase/merge をそろそろキチンと理解する

なんなのかと

rebase

品質を落とす、品のない振る舞いをする

git rebase

つかいみち : ブランチにmasterの変更を取り込む

例えば、こんな感じに、 master と、branch_b がある場合...

* ac7957d Add 'd' in a.txt
| * 9aa15f9 (refs/heads/branch_b) Add 'c' in b.txt
| * b129f6c Add b.txt
|/
* 3d940b6 Add 'b' in a.txt
* 26ba7e0 Add a.txt
git checkout branch_b
git rebase master

git rebase master を実行すると、masterHEAD の上に、 branch_b が乗っかる感じになる

  • ブランチ分岐後に追加された変更 ac7957d の上に、 branch_b の変更が乗っかる
* a27055b (HEAD -> refs/heads/branch_b) Add 'c' in b.txt
* 7d45f1d Add b.txt
* ac7957d (refs/heads/master) Add 'd' in a.txt
* 3d940b6 Add 'b' in a.txt
* 26ba7e0 Add a.txt

上のような状態を fast-forward な関係にある という

git rebase --interactive

つかいみち : コミットの履歴を編集する

* afe1290 (HEAD -> refs/heads/make_01_txt) Add 'aaa' on 01.txt
* cccfaee Add 01.txt
* 183848b (refs/heads/master) first commit
git rebase -i 183848b

commit番号より上のcommitについて、 git rebase --interactive を行う

pick cccfaee Add 01.txt
pick afe1290 Add 'aaa' on 01.txt

# Rebase 183848b..afe1290 onto 183848b (2 command(s))
#
# Commands:
# p, pick = use commit
# r, reword = use commit, but edit the commit message
# e, edit = use commit, but stop for amending
# s, squash = use commit, but meld into previous commit
# f, fixup = like "squash", but discard this commit's log message
# x, exec = run command (the rest of the line) using shell
# d, drop = remove commit
#
# These lines can be re-ordered; they are executed from top to bottom.
#
# If you remove a line here THAT COMMIT WILL BE LOST.
#
# However, if you remove everything, the rebase will be aborted.
#
# Note that empty commits are commented out
  • pick commitを採用
  • reword 名前変更
  • squash 上のcommitと合体
  • fixup 上のcommitと合体(commitメッセージは捨てる)

こうする

reword cccfaee Add 01.txt
fixup afe1290 Add 'aaa' on 01.txt
  • この場合、 9f6ec01 は、上のcommitと合体
  • その上で、79f2ab0 のコミットメッセージを変更

すると、commitメッセージの変更画面が出るので変更する

* 4625879 (HEAD -> refs/heads/make_01_txt) Create 01.txt
* 183848b (refs/heads/master) first commit

すっきりした!

ちなみに

  • git rebase --interactive の時に、commitの順序の入れ替えもできるので便利です

git rebase のログを見る

git reflog
4625879 HEAD@{0}: rebase -i (finish): returning to refs/heads/make_01_txt
4625879 HEAD@{1}: rebase -i (fixup): Create 01.txt
4cdf15a HEAD@{2}: rebase -i (reword): Create 01.txt
cccfaee HEAD@{3}: cherry-pick: fast-forward
183848b HEAD@{4}: rebase -i (start): checkout 183848b
afe1290 HEAD@{5}: commit: Add 'aaa' on 01.txt
cccfaee HEAD@{6}: commit: Add 01.txt
183848b HEAD@{7}: checkout: moving from master to make_01_txt
183848b HEAD@{8}: commit (initial): first commit

git rebase を元に戻したい!!

HEAD@{0}〜HEAD@{4} までが、git rebase でやったこと

git reset --hard HEAD@{5}

直前の git rebase を戻したいのであれば

git reset --hard ORIG_HEAD

mergeやreset、rebase を行った直前の HEAD (べんり!!!!!!)

git merge

ブランチ make_01_txtmaster にマージする

* afe1290 (HEAD -> refs/heads/make_01_txt) Add 'aaa' on 01.txt
* cccfaee Add 01.txt
* 183848b (refs/heads/master) first commit

git merge --ff

fast-forward な関係ならば、マージコミット無しでマージする

git merge make_01_txt --ff
* afe1290 (HEAD -> refs/heads/master, refs/heads/make_01_txt) Add 'aaa' on 01.txt
* cccfaee Add 01.txt
* 183848b first commit

fast-forward な関係じゃない場合は?

* e838a79 (HEAD -> refs/heads/master) Add 02.txt
| * afe1290 (refs/heads/make_01_txt) Add 'aaa' on 01.txt
| * cccfaee Add 01.txt
|/
* 183848b first commit

マージコミットが作られる

*   33cd880 (HEAD -> refs/heads/master) Merge branch 'make_01_txt'
|\
| * afe1290 (refs/heads/make_01_txt) Add 'aaa' on 01.txt
| * cccfaee Add 01.txt
* | e838a79 Add 02.txt
|/
* 183848b first commit

git merge --no-ff

fast-forward な関係でも、マージコミットを作る

git merge make_01_txt --no-ff
*   4084ea5 (HEAD -> refs/heads/master) Merge branch 'make_01_txt'
|\
| * afe1290 (refs/heads/make_01_txt) Add 'aaa' on 01.txt
| * cccfaee Add 01.txt
|/
* 183848b first commit

それぞれどういう時に使うの?

この辺はプロジェクト毎のルール次第のような

  • ブランチをマージする時には、コミットを1個にsquashしてからマージするとか
  • 必ず、マージコミットを作る為に --no-ff をつけるとか

git cherry-pick

特定のcommitをカレントブランチの先頭に乗っける

こんな場合

* ac7957d (HEAD -> refs/heads/master) Add 'd' in a.txt
| * 9aa15f9 (refs/heads/branch_b) Add 'c' in b.txt
| * b129f6c Add b.txt
|/
* 3d940b6 Add 'b' in a.txt
* 26ba7e0 Add a.txt

branch_b9aa15f9 を、masterHEAD にのせる

git checkout master
git cherry-pick b129f6c
* f16c177 (HEAD -> refs/heads/master) Add b.txt
* ac7957d Add 'd' in a.txt
| * 9aa15f9 (refs/heads/branch_b) Add 'c' in b.txt
| * b129f6c Add b.txt
|/
* 3d940b6 Add 'b' in a.txt
* 26ba7e0 Add a.txt

参考

次回予告

git pull --rebase を理解する

(おまけ)

本記事の git log は以下のオプションで出力してます

git log --graph --oneline --branches --decorate=full

エイリアスにしておくと便利かも